Tuesday, September 15, 2015

Running your webdriver tests on a Mac OS via Jenkins

Introduction

Last week we have spoken about Xamarin Studio as an alternative for Visual Studio on a Mac OS.
This week we will see how we can run our webdriver tests on a Mac.

Requirements

Mono should be installed on the Mac for building and running tests from Xamarin solution.
Git should be installed on Mac for controlling source management systems.
NuGet.exe for restoring the packages used in the Xamarin solution.
NUnitConsole.exe used to run nunit tests.

Install Jenkins
First, we need to install Jenkins on the Mac OS. Jenkins can be installed in 3 ways:

  • as a deamon
  • inside a servlet
  • as a normal process
Most CI systems run in the background. This is suitable for scenarios where there is no GUI interaction required. But, for webdriver tests we need this interaction, meaning that the third scenario is the best one to be used. The following link is describing how you can install Jenkins.App as a standalone application: https://developer.xamarin.com/guides/cross-platform/ci/jenkins_walkthrough/.

Jenkins Plugins

In order to create a job for running webdriver nunit tests written in Xamarin Studio, integrated with git we need to intall the following jenkins plugins:
  • Git Plugin
  • NUnit plugin
  • Xamarin Studio Tool Runner Plugin
In order to install them, go to Manage Jenkins --> Manage Plugins and in Available tab enter the plugins specified above.


Jenkins Configuration

Besides adding some plugins we need also to do some global configurations in Manage Jenkins --> Configure System.


Here, you'll need to set the path to git. In my case, the location is "/usr/local/git/bin/git".

Create the Job

Next, you'll have to create a new job. First you should made the settings for the source control management:

Create a step of type Execute shell that is used to restore the packages available in the solution in the jenkins workspace folder. Example of command to use:

mono --runtime=v4.0.30319 /Users/raluca/Desktop/Raluca/PINHelpers/Nuget/NuGet.exe  restore /Users/raluca/.jenkins/jobs/macPinChromeMac/workspace/aut/Pin_Selenium_Testing-Xamarin/Pin_Selenium_Testing.sln

where /Users/raluca/Desktop/Raluca/PINHelpers/Nuget/NuGet.exe is the nuget location and 
/Users/raluca/.jenkins/jobs/macPinChromeMac/workspace/aut/Pin_Selenium_Testing-Xamarin/Pin_Selenium_Testing.sln is the location of your project under source control
Next, we need to build the Xamarin solution. For this, having the appropriate plugin installed, we can create a step of type Build a Xamarin Studio solution using mdtool:

You need to provide the path to your .sln solution, starting from the jenkins workspace folder:
The following step is to run nunit tests. This is achievable by adding another Execute shell step that is using mono:
mono --runtime=v4.0.30319 /Users/raluca/Desktop/Raluca/PINHelpers/NUnit-2.6.4/bin/nunit-console.exe /Users/raluca/.jenkins/jobs/macPinChromeMac/workspace/aut/Pin_Selenium_Testing-Xamarin/PinTests/bin/Debug/PinTests.dll -xml:nunit-report.xml

where /Users/raluca/Desktop/Raluca/PINHelpers/NUnit-2.6.4/bin/nunit-console.exe is the path to nunitconsole executable
/Users/raluca/.jenkins/jobs/macPinChromeMac/workspace/aut/Pin_Selenium_Testing-Xamarin/PinTests/bin/Debug/PinTests.dll is the path to the .dll containing the tests to be executed and 
nunit-report.xml is the file, generated in the same Debug folder that will be later used to obtain the test results in a nice format.

The last step is a post build step that will generate the test results. Just provide the .xml name from the previous step:

Run your Test

Now, you should be able to run your test, either manually, either periodically by making the desired settings in Build Triggers. The example below is executing the job every day at 6 AM:


After the run finishes you should see the test result similar with the image below:


Next week I'll explain how you can run your tests on different browsers by using the same .sln, an app.config and Jenkins.

Happy testing and... make it green, becomes a dream :).

Wednesday, September 9, 2015

Running Selenium WebDriver on both Mac and Windows OS

Introduction

I've been working for a project that must execute Selenium WebDriver tests on both Windows and Mac operating systems. Unfortunately, for those who prefer c# instead java, we cannot install Visual Studio on Mac. But there is an alternative.

Xamarin Studio

The tool comes with a starter edition, which is free and can be downloaded from here: https://store.xamarin.com/ (look for 'Try Xamarin Starter Edition'). With this you can create library projects and nunit projects for your selenium tests.


How does the solution look like?
- you can create a library project to store the pages definition
- you can create a nunit project to store the tests to be executed
For more details about Selenium Web Driver Page Objects you can watch these presentations on pluralsight:
- http://www.pluralsight.com/courses/selenium
- http://www.pluralsight.com/courses/automated-testing-framework-selenium


With Xamarin Studio you have possibility to add the solution in a Version Control System, like git for Visual Studio Online.
This tool will be used when writing tests on Mac. On Windows you can use either Xamarin or Visual Studio (for the same solution). I prefer Visual Studio because I can benefit from the functionality of Resharper.

Jenkins

The next step is to include your solution in a continuous integration system. I use Jenkins for this.
For Mac, use this version: https://github.com/stisti/jenkins-app. 

Conclusions

By using Xamarin on Mac and Visual Studio on Windows and for example git for Visual Studio Online, you can run tests included in the same solution and have different configurations in Jenkins, like:
- Windows + Chrome
- Windows + Firefox
- Windows + IE
- Mac + Firefox
- Mac + Chrome

Next week I'll explain how to create a Jenkins configuration for Mac.

Happy testing and... make it green, becomes a dream :).
For every post I'll recommend something to read. The link for today is:  Xamarin Cross-platform Application Development - Second Edition

Wednesday, August 12, 2015

Selenium Webdriver Drag and drop for HMTL5 elements in C#

Introduction

Recently, I was confronted with the necessity to perform drag and drop actions for a html5 element in a selenium webdriver test written in c #.
That is why In this article I will show you how we can simulate this action by inserting javascript code.

'Simple' approach

Normally, a drag and drop is performed in C# --> selenium webdriver by using Actions class, like this:


or

but for html5 elements, this may not work.

'Javascript' approach

That is why, an alternative is to simulate the drag and drop by inserting javascript code. 
Copy this file, call it for example 'drag.js' somewhere on your your computer. The content of the file is:


(function ($) {
    $.fn.simulateDragDrop = function (options) {
        return this.each(function () {
            new $.simulateDragDrop(this, options);
        });
    };
    $.simulateDragDrop = function (elem, options) {
        this.options = options;
        this.simulateEvent(elem, options);
    };
    $.extend($.simulateDragDrop.prototype, {
        simulateEvent: function (elem, options) {
            /*Simulating drag start*/
            var type = 'dragstart';
            var event = this.createEvent(type);
            this.dispatchEvent(elem, type, event);

            /*Simulating drop*/
            type = 'drop';
            var dropEvent = this.createEvent(type, {});
            dropEvent.dataTransfer = event.dataTransfer;
            this.dispatchEvent($(options.dropTarget)[0], type, dropEvent);

            /*Simulating drag end*/
            type = 'dragend';
            var dragEndEvent = this.createEvent(type, {});
            dragEndEvent.dataTransfer = event.dataTransfer;
            this.dispatchEvent(elem, type, dragEndEvent);
        },
        createEvent: function (type) {
            var event = document.createEvent("CustomEvent");
            event.initCustomEvent(type, true, true, null);
            event.dataTransfer = {
                data: {
                },
                setData: function (type, val) {
                    this.data[type] = val;
                },
                getData: function (type) {
                    return this.data[type];
                }
            };
            return event;
        },
        dispatchEvent: function (elem, type, event) {
            if (elem.dispatchEvent) {
                elem.dispatchEvent(event);
            } else if (elem.fireEvent) {
                elem.fireEvent("on" + type, event);
            }
        }
    });

})(jQuery);

Create a function like below:


Use this function like this:


where
- '.timelineList:nth-of-type(3)>div > div' is the CSS locator of the element from which the drag will be performed. Replace it with your css selector.
- '.bread-crumbs.bread-crumbs-home.btn.btn-default' is the CSS locator of the element to which the drop will be performed. Replace it with your css selector.

That's it! Don't forget to use CSS locators. It may not work with xpath, class name, etc.

Many thanks to Bogdan whose contribution in achieving this functionality was important.

Happy testing and... make it green, becomes a dream :).
For every post I'll recommend something to read. The link for today is: Selenium Design Patterns and Best Practices

Wednesday, August 5, 2015

Integrate your MSTests in Teamcity with Git, MSBuild, NuGet

Introduction

In this article we will learn how we can run MStests in Teamcity for a visual studio solution that is shared online with Git. 
What so we need: TeamCity agent on which we can run our tests.

Version Control Settings

Open TeamCity site and go to Administration.
Select the project for which you want to define a new configuration and press the button Create build configuration. 

Enter the name and the description and press Create.

Then, we have to attach or create new Version Control Settings for this configuration, used in order to take the latest data for this configuration by using a Version Control system. There are different VC systems like TFS, SVC, etc. In this case we will use GIT.
Press Create and in Type of VCS, select GIT. Then, do the settings like images below (enter name, url, authentication method = password, username and password). Test connection and Create VCS.


Press Create and in Type of VCS, select GIT. Then, do the settings like images below

Build Steps Configuration

Once we have defined a VCS we can start defining the build steps. We need 3 steps, one to restore the packages that are used in the solution, one to build the solution and the last to run the tests.


Step NuGet will look for Nuget.Config and will copy the packages in the location specified in this file.


Nuget.config example:
<?xml version="1.0" encoding="utf-8"?>
<configuration>
  <solution>
    <add key="disableSourceControlIntegration" value="true" />
  </solution>
  <config>
    <add key="repositoryPath" value=".\Packages" />
  </config>
  <packageRestore>
    <add key="enabled" value="True" />
    <add key="automatic" value="True" />
  </packageRestore>

</configuration>
Step build


Step run MsTests (the path to the .dll with tests should be in ...\bin
release)


Additional steps and configurations

If we want to run the tests on a specific agent we need to specify this in Agent Requirements area.


Happy testing and... make it green, becomes a dream :).

Friday, June 26, 2015

Write your 1st Test with Specflow and Selenium WebDriver

Introduction

Recently I've been asked by a blogger how can I use SpecFlow to write a test in Visual Studio. 

"I am a beginner in test automation and I try Cucumber -> Specflow -> Selenium Webdriver . If you have experience with such tools, an article would be useful. It is not clear for me how "generic operations" (picking up a certain browser, opening / closing a browser session etc) can be embedded into a Specflow feature file (hooks maybe?)"

In this article I'm going to explain how you can create your first test with SpecFlow and Selenium WebDriver, by using TDD and Page Object Model.

Install IDE integration

For using SpecFlow it is recommended to install the IDE integration. I use Visual Studio 2013, so I downloaded this IDE from this location: https://visualstudiogallery.msdn.microsoft.com/90ac3587-7466-4155-b591-2cd4cc4401bc.
If you are using different versions of Visual Studio, visit SpecFlow page about IDE installation.

Setup First SpecFlow Project

Before starting, I'd like to start with recommending to have:
- one project with all SpecFlow tests, let's call it SpecFlowTests 
- another project that will contain SpecFlow page objects, let's call it SpecFlowPages, that will contain the methods that will access the browser objects by using Selenium WebDriver. 
I'm not going to talk about Page Objects and Selenium in this article, but there is a very useful presentation on PluralSight that you can watch it: http://www.pluralsight.com/courses/automated-testing-framework-selenium.

Setup Project using NuGet

For this demonstration I'm going to use MStest. Ready? Let's start!

1. Open Visual Studio and create a new TestProject-->Unit Test Project and name it SpecFlowTests.


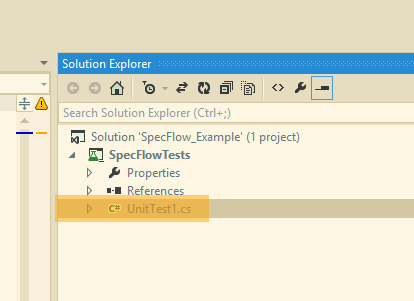
2. Remove UnitTest1.cs from Solution Explorer, cause you are not going to need it.


3. In Solution Explorer --> SpecFlowTests project --> References right-click and select Manage NuGet Packages. Make sure you selected Online option from the left part and then in the search area enter SpecFlow.


4. You will notice that an App.config file was generated in the structure of the project. Because we chosen to use MSTest to execute out tests, we need to do a configuration in this file.


5. Now we can build our solution and we are ready to add our first test. The test that I'll perform is this:
- Open http://www.specflow.org/ page
- Hover over SpecFlow+ link text
- Click SpecFlow+ Excel on link text
- Check Get Started Now with SpecFlow+ Excel! if the button is available 

6. Create a new SpecFlow feature by right-clicking on the project name --> Add --> New Item --> Visual C# Items --> SpecFlow Feature File. Name the feature --> NavigateSpecFlowExcel.


7. In the feature description we should enter the feature that we have to test and the scenario in Gherkin language. These features, represents in fact acceptance criteria of the application (use cases, user stories). For more information about this language, please access this page. For our example, please enter this feature:


8. Now that we defined the scenario we should Generate the step definitions. For this, right-click somewhere on the feature file and select Generate Step Definitions. 


9. You will see a dialog for generating the Class for all steps. Generate it


10. Choose the location where to store this class. It should be in the same project.  A new .cs file will be generated with a default content.


11. We need now to implement the methods for the scenarios. We can TDD this and start writing the methods like this.


12. Some remarks about this
- if you will build now the solution, it will normally fail, because there are some classes that should be implemented
- [BeforeScenario] and [AfterScenario] are two attributes, used to say that those actions should be run before and after a scenario/test
- we should implement Driver class that is used for setting the browser to work with via selenium, navigation to the page we want to use, etc
- ConstantsUtils class, is a class where we store constants used in the application like, the url page, strings etc.
- NavigateToSpecFlowExcel class, is the class used to navigate to the desired page, identifying objects with Selenium etc.

All these classes should be separated from the tests itself, so let's create a new project SpecFlowPages, with these 3 new classes.
- right-click the solution and Add --> New Project -->SpecFlowPages
- remove UnitTest.cs, cause we don't need it
- add 3 classes, which should be public classes: Driver, ConstantsUtils and NavigateToSpecFlowExcel 
- in the SpecFlowTests project, add in References --> right-click --> Add References --> Projects --> select project SpecFlowPages. Now, the classes will be referenced in our test and your binding should look like this:


- in the SpecFlowPages project, add Selenium WebDriver references with NuGet: right-click  References --> Manage NuGet Packages --> Online --> search for selenium and install Selenium WebDriver and Selenium WebDriver Support Classes


- we need to implement the classes with they methods. To do this you can go to NavigateSpecfFlowExcelSteps.cs and click on the method that is not implemented (red) and click ALT+Enter. This will add a new method on the correct class. You should do this for every method, property that is not implemented


- The structure of the project should be like in the image below:


13. Finally, the Driver class should look like this:


14. Finally, the ConstantUtils class should look like this:


15. Finally, the NavigateToSpecFlowExcelclass should look like this:


16. One more thing you have to do is to add the reference Selenium WebDriver under SpecFlowTests project, because this is used in [BeforeScenario]/[AfterScenario] attributes. Also, if you want to use ChromeDriver, instead FirefoxDriver to run your test, you need to add ChromeDriver into your SpecFlowPages project. To do this go to Referecens --> right click --> Manage NuGet Packages --> Online --> search for ChromeDriver


Run Tests

Now we are ready to run our test. There are different ways to do this
1. Open NavigateSpecfFlowExcel.feature file, right-click somewhere and select Run SpecFlow Scenarios


2. Run the test from Test Explorer


Some Refactoring

There is still a better way to organize our solution.

1. In order to avoid writing for each test/scenario [BeforeScenario] and [AfterScenario] actions that should be done before/after each test, we can extract the information into a different class, called Start, that will inherit Driver class. Also, all binding tests, will inherit Start class.


2. We can even organize the structure of our files better like below:


... and the Source files

For a better understanding of this example, I've uploaded the project under GitHub, so you can download it from here: https://github.com/suditur/SpecFlow_Selenium_TDD_PageObject_Example.git


I hope you enjoyed this article!
Want to lean more about BDD? Have a look on this book: BDD in Action: Behavior-driven development for the whole software lifecycle

Happy testing and... make it green, becomes a dream :).

Popular Posts