Monday, January 9, 2017

Postman - Extracting login token and using it in requests

Introduction


Postman is a powerful GUI platform to make your API development faster & easier, from building API requests through testing, documentation and sharing. In this article we'll show you how to:

- take the token from your login post and use it later for authorization in later requests
- define environment variables and use them in requests
- test your API by testing response code, response time, response body content, etc.
As example, we are going to test this workflow: 
- login to https://www.pincello.com
- create a new timeline

* Pincello is a beta web application that allows you to make professional timelines quickly that is the Web  version of a PowerPoint addin (for more details visit https://www.officetimeline.com/).

Extract token data from login
Postman gives the possibility to extract values from the response and saving it inside an environment or a global variable. Environment and global variables let you keep track of everything that affects API state. Some examples of common variables you would use with an API are session tokens, user IDs, file IDs.
What are the steps for taking the token from login:

1. Launch Postman Chrome Extension
2. Create a new collection (from the top left part)


3. Name it, for example Pincello Testing


4. Open Manage Environments (from the top right part)


5. Add a new environment, e.g. Pincello and add a new key, e.g. token. Leave the value empty.


6. Set this environment (Pincello) to the current collection (Pincello Testing)


6. Post login data and extract via Test tab the access_token and then place it in the environment variable.
In this case we need to create a new request with
- url = {{url}}/token, where {{url}} is another environemnt variable that represents your url that you want to test
- type POST
- body, in this case of type x-www-form-urlencoded with some inputs, those values are stored also as environment variable


*every call to an environment variable is made by using environment key value with {{}}


- you then need to go to Test tab and place the result of post response in token environment variable. To do this, white this javascript code in your Test tab


7. Write tests for login request, e.g. response time, response status code = 200. To do this add tests to your Test tab from Code list


8. Every request after login, will require an authorization, thus, we should add Authorization header for the next requests like in the image below, by using the token previously extracted.


9. Continue with your API testing. Here are some examples:


10. Run the tests


11. Check your tests results


Happy testing and... make it green, becomes a dream :)

Thursday, January 5, 2017

Web Performance Testing with Visual Studio - Replacing Context Parameter Value with a Data Source Value

Introduction

Visual Studio Enterprise 2015 or Visual Studio Ultimate 2013, gives you the possibility to test the performance of your application. In this article we'll show you how to replace the value of a context parameter with a value from a data source. Why do we need this? Instead using a context parameter in each web test, we can take the value from a .csv, value that can be later changed, in case we want to run tests on a different environment (e.g. site value).


Adding Data Source

It seems that binding values to Form Post parameters it is possible, but for context parameters this is not. In this case, a solution would be to:
- add a data source for your .csv file
- replace all occurrences of the context parameter with the data source
- remove the context parameter

In the example above:
- add a new data source to you .csv file (right click on webtest name + Add Data Source...), in the example this will have the name FormInputs
- replace all occurrences of {{URL}} with {{FormInputs.FormValues#csv.Site}} (right click on webtest name + Find and Replace in Request...)
- delete context parameter {{URL}}

The result should be like in the image below:


Happy testing and... make it green, becomes a dream :)

Wednesday, December 21, 2016

Web Performance Testing with Visual Studio - Extracting login token

Introduction

Visual Studio Enterprise 2015 or Visual Studio Ultimate 2013, gives you the possibility to test the performance of your application. In this article we'll show you how to extract .json login token for later use by using a Text Extraction Rule. If you don't have this information, after login, you'll get a 401 Unauthorized error.

Extract token

First of all, run your recorded test and check the test result. Go to the request that contains the token and check Response tab. In the example below, you can notice that the access token is stored in a .json.


Using extraction rule

Extracting the token is possible, by using Extraction Rules functionality. To do this, go to your recorded request (for login), right click on request name and add new extraction rule.


Select the extraction rule of type Extract Text, enter Context Parameter Name (the name of a test variable to associate with the extracted value), Starts With and Ends With, like in the image below.


After doing this, your request should look like this.


Use token to authorize

The extracted token should be used in the requests performed after login. To do this select the request, right click and Add Header


In properties, add an Authorization header with this value: Bearer {{myToken}}.


Happy testing and... make it green, becomes a dream :)


Monday, December 5, 2016

Web Performance Testing with Visual Studio - Add a CSV File Data Source

Introduction

Visual Studio Enterprise 2015 or Visual Studio Ultimate 2013, gives you the possibility to test the performance of your application. In this article we'll show you how to use a CSV Data Source in order to bind data from you post parameters o string body to CSV values. It is required that you already know how to create a new performance test/record it, etc. If you don't, you can inspect MSDN documentation here.
Why should I use CSV Data Source?

You can use data binding in a Web performance test to provide values for input form posts or string body. For example we may have a list of logon emails and passwords that would be used during the execution of web performance tests to try repeated logons. Or, we can create a data source for the parts of the tests that are using the same input values. If those values will be changed, we only have to update the CSV file.

How to add CSV Data Source?

This link explains how to bind your data to a CSV file: https://msdn.microsoft.com/en-us/library/bb385971(v=vs.90).aspx.

"To add the data source to the Web test
  1. In the Web Test Editor, right-click the top node of the Web test and then click Add Data Source.
    The New Test Data Source Wizard appears.
  2. In the Data source name box type a name for your data source.
  3. In the Data source type list click CSV File.
  4. Click Next.
  5. In the Choose a CSV file box enter the path and name of the file, or click the ellipsis to browse to the file. For example, enter the following:
    <Your Path>\FileName.csv
    The data from the CSV file appears in the Preview data pane. The first 1,000 rows of data are displayed.
  6. Click Finish.
    A dialog box appears that asks you if you want to add the file to your current project. You can use the following information to help you decide:
    Response
    Result
    Advantage
    Yes
    The file is copied to the project.
    When the project is deployed, there is no extra work that is required.
    No
    The file is not copied to the project. When the project is deployed, you might have to update the path of the file.
    Some data files can be very large, and should be maintained separate from the project. Some data files must be shared among several members of a team, and should be maintained in a central location that all members can access.
  7. Click Yes or No.
    Data Sources node will be added to the Web test, and the text file will appear as a table in the hierarchy.
  8. On the File menu click Save to save the Web test."

The CSV file should have this format:
- the first record represents the columns to be bind to
- the following records represents the data you want to bind

How to bind Data Source in your tests?

You can replace input posts with data from your Data Source previously added.


You can also replace data inside string body with CSV values by replacing recorded value with format:
"{{DataSourceName.CSVFileName#csv.ColumnName}}"
Here is an example for a string body where title value was replaced with a value from a CSV file:


Happy testing and... make it green, becomes a dream :)

Tuesday, November 22, 2016

Jenkins - Run Visual Studio Performance and Load Tests

Introduction

Visual Studio Enterprise 2015 or Visual Studio Ultimate 2013, gives you the possibility to test the performance of your application. If you don't want to run tests in a CI you can use Jenkins.

What do you need?

1. Jenkins with MSTest Plugin installed is required. Don't forget to set the path to mstest.exe in Manage Jenking --> Global Tool Configuration:


2. Then, you have to create a new Jenkins job, set a Source Code Management (e.g. git, tfs, etc.).
Delete work-space before build starts.


3. Create batch command step that should
- restore nuget packages (if any)
- build the solution

..nuget location\nuget.exe restore "..performance project location\yourproject.sln"
..msbuild location\msbuild.exe "..performance project location\yourproject.sln " /p:Configuration=Debug

4. Create a Run unit tests with MSTest step that should contain:
- MSTest version defined in Global Tool Configuration
- performance/load tests + path
- result name to store .trx results 


5. Add a post build step of type Publish MSTest test result report like in the image below (exclude this step for a load test, included only for performance tests):


6. Finally, attach as artifacts, all .webtestResult files (for performance tests) or .trx files for load tests.


Visualize test results

For a performance test, the test results should look like this


You can notice, failure results and all .webtestResult files attached as artifacts. If you have a failed test, e.g. in this example MAINPortfolioDuplicate, just click on MAINPortfolioDuplicate.webtestResult. Open this with Visual Studio and you'll see the cause of the error.


For a load test, open .trx artifact in Visual Studio to see test results display in Test Results window.


Once you'll click on a test result, you'll see details with graphs


and errors:


Happy testing and... make it green, becomes a dream :)

Monday, November 14, 2016

Web Performance Testing with Visual Studio - JSON Extraction rules

Introduction

Visual Studio Enterprise 2015 or Visual Studio Ultimate 2013, gives you the possibility to test the performance of your application. In this article we'll show you how to use extraction rules in order to take information from a JSON response that is later used in a performance recorded test. It is required that you already know how to create a new performance test/record it, etc. If you don't, you can inspect MSDN documentation here.

Access token

In our application, we have a login form. After submitting, we receive a JSON response that contains variable access token that is used to authenticate in the application. In order to use this information, we need to use an extraction rule, to later use it in other requests.


Visual studio comes with some predefined rules, but, none of them is capable to extract information from a JSON. That is why we need to create a custom extraction rule.

What are the steps for creating a custom extraction rule:
  1. Open a Test Project that contains your Web performance test
  2. Create a separate class library project, e.g. ExtractionRule
  3. In the Class library project, add a reference to the Microsoft.VisualStudio.QualityTools.WebTestFramework dll
  4. Create a class that derives from the ExtractionRule class. Implement the Extract and RuleName members, e.g. JSONExtractionRuleClass (see below, the code for this)
  5. Build the new Class library project
  6. In the Test Project, where your performance test is, add a reference to the Class library project that contains the custom extraction rule  
  7. In the Test Project, open a Web performance test in the Web Performance Test Editor
  8. To add the custom extraction rule, right-click a Web performance test request and select Add Extraction Rule.
    The Add Extraction Rule dialog box appears. You will see your custom validation rule in the Select a rule list, together with the predefined validation rules. Select your custom extraction rule and then choose OK   
  9. Use this context parameter extracted from a JSON to later authenticate your requests. To do this, add a header to your request with name = Authorization and value = Bearer {{loginToken}}  
  10. Run your Web performance test
JSONExtractionRuleClass

The code for extracting the rule, necessary to pass step 4 is the following


Happy testing and... make it green, becomes a dream :)

Wednesday, November 2, 2016

1 Way to Integrate Applitools Eyes with Jenkins

Introduction

In an older post we talked about Applitools Eyes. What is it? It is an automation testing tool that will check all visual aspects of the application from a given screen, meaning that we don't need to write separate tests for each UI element on the screen. The tool provides easy integration with different test tools and frameworks like Selenium, CodedUI, HP QC, etc

Jenkins Integration

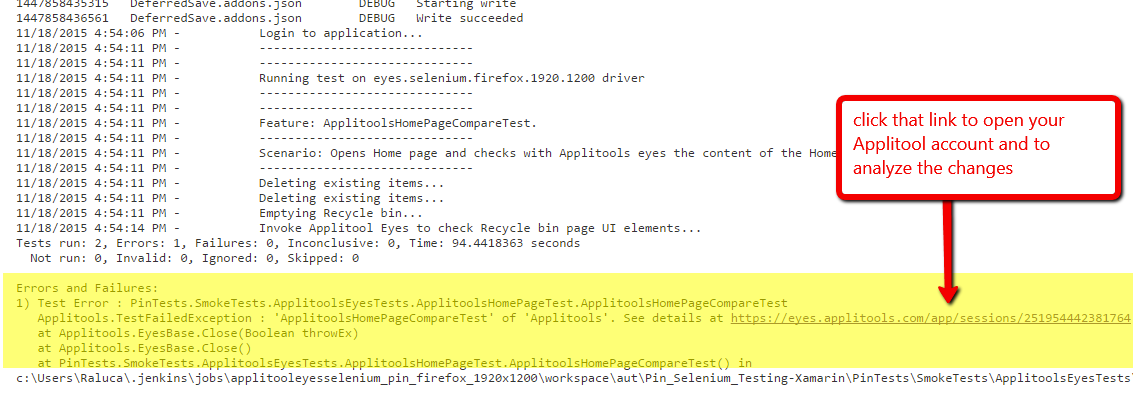
You can create a job that is running only tests having category = "Applitool". If a test fails, you will notice in Jenkins an error with a link to Applitools eyes site, that will load applications's UI, where you will be able to evaluate the test result, accept/reject changes, etc.


But, if there are several failures in the application, clicking on every link will be annoying. That is why, we can use Jenkins plugin, we will be able the integrate applitools ui directly in Jenkins.

Applitools Eyes Plugin

Go to Jenkins --> Manage Jenkins --> Manage plugins and install this plugin.
Go to Applitools job configuration and Build Environment check Applitools Support


Go to your project solution and add this:


and, before instantiating Eyes driver, do this:


Then run your job. Applitools Eyes will be integrated inside Jenkins. There you be able to accept/reject changes, etc, directly in Jenkins.


If you want to read more about this, please watch this video.

I hope you enjoyed this article!
Happy testing and... make it green, becomes a dream :).

Popular Posts