Tuesday, January 26, 2016

Linking your Selenium Tests to Microsoft Test Manager (2)

Introduction


Last time we talked about a way of linking selenium Mstests to MTM. This week we will see another way of linking an automated test with a MTM test plan by using tcm import tool (so we don't need to to this manually).

TCM Import


Here you have the link to MSDN documentation https://msdn.microsoft.com/en-us/library/ff942471(v=vs.120).aspx. 
The purpose of this tool is to import automated tests (selenium, codedui, unit tests, etc.) to a Test plan written in MTM (Microsoft test manager). The import will be done only for MSTests methods (not NUnit). The result of the import will create an work item of type Test Case in TFS, for every existing TestMethod in your projects. The example from the last post was this.


Here we have only one method named CodedUiTestMethod1, which, in fact contains Selenium code. 
In order to create a corresponding Test Case work item I did this:
- Opened Developer Command Prompt for VS2013 that you can find it in Visual Studio Tools folder (e.g. C:\Program Files (x86)\Microsoft Visual Studio 12.0\Common7\Tools\Shortcuts for VS 2013)
- In cmd navigated to the location of your .dll with tests
- Run this command
tcm testcase /import /collection:https://myonlineproject.visualstudio.com/DefaultCollection

/teamproject:myProjectName /storage:LinkMTMSelenium.dll
- Now the Work item of type Test case with the name CodedUiTestMethod1 is created
- Associate this Test Case to a Project Plan in MTM

- Set your environment in MTM like described in the previous post
- Run your test from MTM from Test tab. Run will be run on the configured environment 


- Search results will be displayed at the end and the required 


- You will be able to see the test results also in VS Online

Happy testing and... make it green, becomes a dream :).


Friday, January 15, 2016

Linking your Selenium Tests to Microsoft Test Manager

Introduction


In this article we will write about how you can link your selenium web driver tests from Visual Studio to Microsoft Test Manager.
Why should we do this? Because with CodedUI you can run your tests only on a IE browser (even there is a plugin that allows you to run coded ui tests on FF/Ch, which is unfortunately not very stable). With selenium, you'll be able to run them much easier on different browsers.

What do you need for this:

- knowledge about Visual Studio Controllers and agents

- knowledge about TFS builds

- knowledge about MTM (Microsoft Test Manager) and how to set an environment

- Have some tools installed: Visual Studio 2013 Online

- know how to work with Selenium WebDriver with C#
- MSTest (not NUnit)to run the tests


Visual Studio Test Controllers and Agent

I'm not going to give you details about this subject because this is a complex one. But, in order to explain you this post, you need to know what MTM environment is. In order to run your automated tests on a specific page, you need to set an environment, which requires a controller that controls one ore more agents. For more details visit this link: https://msdn.microsoft.com/en-us/library/hh546460(v=vs.120).aspx.
Visual studio agent and controllers can be downloaded from here: https://www.microsoft.com/en-us/download/confirmation.aspx?id=40750.
Once you set your controller, you need to add an environment in MTM. To do this open MTM as an admin --> Lab center and create a new environment.
In Type and name, leave the default standard environment and give a name to this new env
In Machines enter the name of the computer where you want to install your agent that will execute the tests and that will be connected to a controller.
In Advanced, select the controller and check Configure environment to run UI tests = Web Client


Verify and restart computer. After restart you'll see a popup with your agent


MTM Build

Another important setting is the build for your automated testing project (with selenium tests).
A build for a MSTest project can be created from Visual Studio. Having your selenium web driver solution opened, go to Team Explorer --> Builds --> New Build Definition.
In Source Settings Add the Repository name:


Build Default -> if you use Visual Studio Online, you can leave it to Hosted Build Controller
Process --> set the path to your .sln solution
Run your build

Adding Environment and Build to MTM Test Plan

Once you have add your agent and build, you need to assign these two, to your test plan in MTM.
Open it, select your test plan, go to Organize and made the settings below.

Create your Selenium Test and Associate it to a Manual Test from MTM

Now you should create your selenium tests. To be much easier, instead new MSTest, create a new CodedUI test. Why, because you'll need (in order to run it from MTM) the CodedUI attribute for a class. Inspect the code below:


This will only open google home page. You can see the DeploymentItems attributes. They are required, in order to deploy chrome and ie drivers on the agent you'll run your tests.
After you created your test, you need to associate it to a dummy MTM test (or to an existing recording in MTM - see this link for more details: http://blogs.infosupport.com/testing-your-web-application-with-selenium-and-mtm-part-2/).
To associate Mstest to MTM test in Visual Studio (with the solution opened), go to TeamExplorer --> Work Items-->made a new query that will return all manual test cases written for this project --> open your manual tc --> go to Associated Automation and select your MSTest


Now you can start running your test from MTM. While the test runs, you'll see this in Agent Popup.

Happy testing and... make it green, becomes a dream :).

Wednesday, December 23, 2015

Some WebDriver Utils for your Visual Studio project

Introduction

In this article we will write about some utils methods that are useful in your selenium webdriver framework
- Visual Studio 2013
- Selenium WebDriver with C#
- Nunit to run the tests
- An existing page object framework


Utils class

In our framework we created Utils.class that contains different methods used in  nunit tests in order to work with mouse events, selection control, string manipulation, etc.

Mouse Events

If you cannot perform wevdriver mouse events by using the usual way, with action class, replace this with 
javascript.


... and with Action class


Work with Alerts, Windows, Frames

Below, you can find some methods used to switch to alert, window, frame


String helpers


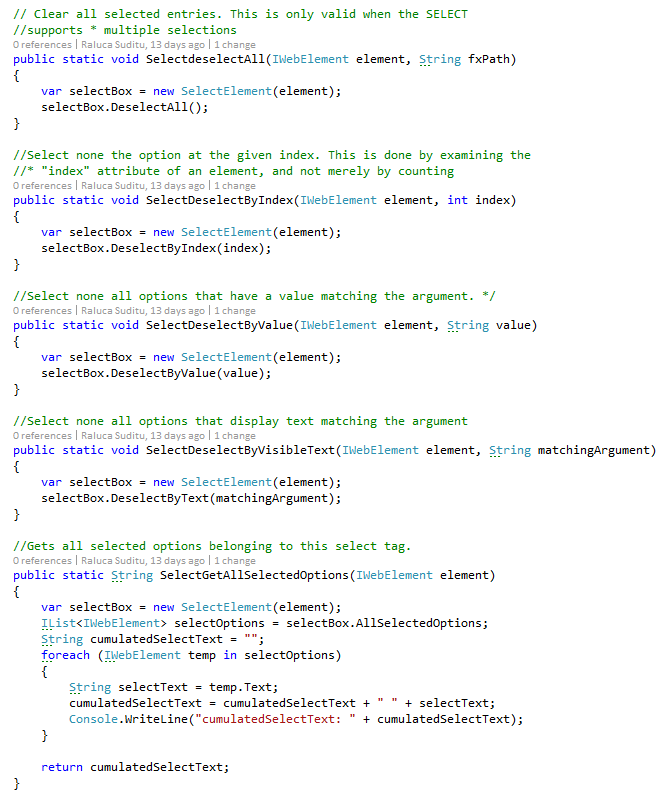
Selection controls


Happy testing and... make it green, becomes a dream :).

For every post I'll recommend something to read. The link for today is:  The C# Player's Guide (2nd Edition).

Wednesday, November 18, 2015

Your First Applitool Eyes Test Integrated in a .NET WebDriver Framework

Introduction

In this article we will talk about Applitool Eyes and how we can use this tool to integrate it in a WebDriver framework.
The following tools were used:
- Visual Studio 2013
- Selenium WebDriver with C#
- Nunit to run the tests
- An existing page object framework
- CI --> Jenkins

What is Applitools Eyes?

It is an automation testing tool that will check all visual aspects of the application from a given screen, meaning that we don't need to write separate tests for each UI element on the screen. The tool provides easy integration with different test tools and frameworks like Selenium, CodedUI, HP QC, etc. It allows testing the application on different browsers and resolutions. The logs that are generated after running the tests are very smart, include playback with step by step actions.
What you need: create an account. Once you are logged in, an API key will be generated for you. This will be used in your framework. Find the key by accessing menu My API key.


The tutorial from applitool site that you can read is this: https://eyes.applitools.com/app/tutorial.html.
The tool has a free limited version that will allow running 25 tests/week. You can find more about pricing here: https://applitools.com/pricing/.

Create your First Test

As described in the tutorial, in order to write your first test you need to add Eyes.Selenium package to your project. Go to your project --> References --> Right click on the project --> Manage NuGet Packages... -->Online -->search for Eyes.Selenium and Install it. The reference will be added to your project.


Then you can create your first test like this:


After you run your test for the first time it will be saved as a baseline. You need to run it again and open Applitools Eyes --> Test Results page to analyze the changes. If your test fails it means that there are wanted or unwanted changes in your application page. Depending on your analysis you can accept (if the change is not a bug) or keep the baseline = reject changes (if we have a bug in the application). For a failed test in the nunit test run window we will see a link to the test report providing the exception thrown by Eyes.Close() method. See image below that is taken from applitool site.


Include Applitool in an Existing Framework

We've seen above a brief description about how we can create our first webdriver + applitool test. But what if we want to have a suite of applitool tests and to include them in an existing framework?
We mentioned in previous posts about page object and a way of separating NUnits/MSTests from page object identification. Have a look on http://ralucasuditu-softwaretesting.blogspot.ro/2015/06/write-your-first-test-with-specflow-and.html because the idea is the same. 
- Create a project where 
  • you keep some Utils to deal with the driver, with the controls, to extend web driver if this is necessary, etc.
  • you keep the page object identification for every page, meaning that this is the place where you find your objects with selenium
- Create another project where
  • you define a Start test for SetUp/TearDown actions
  • you are writing your NUnit tests, without having any reference to webdriver elements
  • create an app.config in which you define what is the application url, login credentials, configuration on which you run your tests (browser). Below, you can see an example of app.config file used in our solution and also, the structure of the project


How to adapt this framework to run tests on applitool?
Open your Driver.cs class and:
  • Use Applitols as reference 
  • Create an Eyes field that is using your API Key

  • Initialize your driver with Applitool
  • To close your driver with Applitools you can use this

  • Driver.Initialize method is used in the Nunit SetUp (i.e. the sequence of code that will be executed before each test that, in our case, is defined in Start.cs class). Driver.Close is used in TearDown  (i.e. the sequence of code that will be executed after each test that, in our case, is defined also in Start.cs class). See an example below:


where GetUnitName is the name of the unit test that will be run and in this case, will also be the name of the Applitool test that will appear in Applitool UI --> Test Results page.


  • Now we are ready to write our tests


  • Check the test result on Applitool UI --> Test Results page.


  • Include your applitool in a CI system, like Jenkins. You can create a job that is running only nunit tests having category = "Applitool". See this link, chapter Specifying Test Categories to Include or Exclude, that shows you how to do this: http://www.nunit.org/index.php?p=consoleCommandLine&r=2.2
  • If a test fails, you will notice in jenkins the error 

I hope you enjoyed this article!
Happy testing and... make it green, becomes a dream :).

For every post I'll recommend something to read. The link for today is: Learning Selenium Testing Tools - Third Edition

Thursday, October 1, 2015

HipChat with Visual Studio Online and Jenkins

Introduction

In this article I'll talk about HipChat and how you can receive notifications from Jenkins and Visual Studio Online related to builds, work item creation, check-ins, etc.

What is HipChat

HipChat is a tool used for... chatting :) from every OS, Mac, Windows, iOS, Linux, from every place, from home, train, your friend's pool. It has a web and a desktop version. You can create a room and invite people from the same project to join the group. 


An interesting feature is that it has the possibility of integration with Jenkins and Visual Studio Online.
For example, we may have a job in Jenkins for selenium tests. When the job is finished, I want to receive a notification in Hipchat about the status of the job and I want to be able to go directly to Jenkins test results page. 
Another example, if my project is managed in Visual Studio Online, I want to be notified when a check in is performed or when a new bug is reported.
For being able to perform this integration, create an account in https://www.hipchat.com/ and download the desktop version from here https://www.hipchat.com/downloads. 
Open the desktop application, login, go to Lobby and Create a Room. Then you can invite people to join the room.


Jenkins and HitChat Integration

If you have a job in Jenkins and you want to receive notification in HitChat room when the job finishes (i.e. selenium tests job is failing), you need to add a Jenkins plugin: HitChat Plugin.
Then, on your job configuration you need to add a post-build step like in the image below, by providing the HitChat room token, id/name and to set the notification settings

How can you obtain the room id and token? Login with the admin account on https://www.hipchat.com and go to your room Summary and Token areas.


When the job finishes you and all members inside room, will get a notification in HitChat.


Visual Studio Online and HitChat Integration

Similar notifications can be received from Visual Studio Online, when you or anybody in the team adds new bugs, tasks, performs a check in, etc. What do you have to do? Go to you Visual Studio Account in the administration panel and open Service Hooks.


Select a HitChat service.


Then you need to trigger the notification event. In the image below you will trigger new bugs.


Finally, you need to set the token and room id, like you did for Jenkins.


In HitChat (desktop or web) you will be notified when a new bug is created.


Happy testing and... make it green, becomes a dream :).
For every post I'll recommend something to read. The link for today is: Mastering Jenkins

Popular Posts