Wednesday, August 5, 2015

Integrate your MSTests in Teamcity with Git, MSBuild, NuGet

Introduction

In this article we will learn how we can run MStests in Teamcity for a visual studio solution that is shared online with Git. 
What so we need: TeamCity agent on which we can run our tests.

Version Control Settings

Open TeamCity site and go to Administration.
Select the project for which you want to define a new configuration and press the button Create build configuration. 

Enter the name and the description and press Create.

Then, we have to attach or create new Version Control Settings for this configuration, used in order to take the latest data for this configuration by using a Version Control system. There are different VC systems like TFS, SVC, etc. In this case we will use GIT.
Press Create and in Type of VCS, select GIT. Then, do the settings like images below (enter name, url, authentication method = password, username and password). Test connection and Create VCS.


Press Create and in Type of VCS, select GIT. Then, do the settings like images below

Build Steps Configuration

Once we have defined a VCS we can start defining the build steps. We need 3 steps, one to restore the packages that are used in the solution, one to build the solution and the last to run the tests.


Step NuGet will look for Nuget.Config and will copy the packages in the location specified in this file.


Nuget.config example:
<?xml version="1.0" encoding="utf-8"?>
<configuration>
  <solution>
    <add key="disableSourceControlIntegration" value="true" />
  </solution>
  <config>
    <add key="repositoryPath" value=".\Packages" />
  </config>
  <packageRestore>
    <add key="enabled" value="True" />
    <add key="automatic" value="True" />
  </packageRestore>

</configuration>
Step build


Step run MsTests (the path to the .dll with tests should be in ...\bin
release)


Additional steps and configurations

If we want to run the tests on a specific agent we need to specify this in Agent Requirements area.


Happy testing and... make it green, becomes a dream :).

Friday, June 26, 2015

Write your 1st Test with Specflow and Selenium WebDriver

Introduction

Recently I've been asked by a blogger how can I use SpecFlow to write a test in Visual Studio. 

"I am a beginner in test automation and I try Cucumber -> Specflow -> Selenium Webdriver . If you have experience with such tools, an article would be useful. It is not clear for me how "generic operations" (picking up a certain browser, opening / closing a browser session etc) can be embedded into a Specflow feature file (hooks maybe?)"

In this article I'm going to explain how you can create your first test with SpecFlow and Selenium WebDriver, by using TDD and Page Object Model.

Install IDE integration

For using SpecFlow it is recommended to install the IDE integration. I use Visual Studio 2013, so I downloaded this IDE from this location: https://visualstudiogallery.msdn.microsoft.com/90ac3587-7466-4155-b591-2cd4cc4401bc.
If you are using different versions of Visual Studio, visit SpecFlow page about IDE installation.

Setup First SpecFlow Project

Before starting, I'd like to start with recommending to have:
- one project with all SpecFlow tests, let's call it SpecFlowTests 
- another project that will contain SpecFlow page objects, let's call it SpecFlowPages, that will contain the methods that will access the browser objects by using Selenium WebDriver. 
I'm not going to talk about Page Objects and Selenium in this article, but there is a very useful presentation on PluralSight that you can watch it: http://www.pluralsight.com/courses/automated-testing-framework-selenium.

Setup Project using NuGet

For this demonstration I'm going to use MStest. Ready? Let's start!

1. Open Visual Studio and create a new TestProject-->Unit Test Project and name it SpecFlowTests.


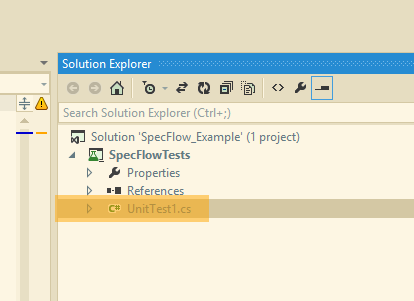
2. Remove UnitTest1.cs from Solution Explorer, cause you are not going to need it.


3. In Solution Explorer --> SpecFlowTests project --> References right-click and select Manage NuGet Packages. Make sure you selected Online option from the left part and then in the search area enter SpecFlow.


4. You will notice that an App.config file was generated in the structure of the project. Because we chosen to use MSTest to execute out tests, we need to do a configuration in this file.


5. Now we can build our solution and we are ready to add our first test. The test that I'll perform is this:
- Open http://www.specflow.org/ page
- Hover over SpecFlow+ link text
- Click SpecFlow+ Excel on link text
- Check Get Started Now with SpecFlow+ Excel! if the button is available 

6. Create a new SpecFlow feature by right-clicking on the project name --> Add --> New Item --> Visual C# Items --> SpecFlow Feature File. Name the feature --> NavigateSpecFlowExcel.


7. In the feature description we should enter the feature that we have to test and the scenario in Gherkin language. These features, represents in fact acceptance criteria of the application (use cases, user stories). For more information about this language, please access this page. For our example, please enter this feature:


8. Now that we defined the scenario we should Generate the step definitions. For this, right-click somewhere on the feature file and select Generate Step Definitions. 


9. You will see a dialog for generating the Class for all steps. Generate it


10. Choose the location where to store this class. It should be in the same project.  A new .cs file will be generated with a default content.


11. We need now to implement the methods for the scenarios. We can TDD this and start writing the methods like this.


12. Some remarks about this
- if you will build now the solution, it will normally fail, because there are some classes that should be implemented
- [BeforeScenario] and [AfterScenario] are two attributes, used to say that those actions should be run before and after a scenario/test
- we should implement Driver class that is used for setting the browser to work with via selenium, navigation to the page we want to use, etc
- ConstantsUtils class, is a class where we store constants used in the application like, the url page, strings etc.
- NavigateToSpecFlowExcel class, is the class used to navigate to the desired page, identifying objects with Selenium etc.

All these classes should be separated from the tests itself, so let's create a new project SpecFlowPages, with these 3 new classes.
- right-click the solution and Add --> New Project -->SpecFlowPages
- remove UnitTest.cs, cause we don't need it
- add 3 classes, which should be public classes: Driver, ConstantsUtils and NavigateToSpecFlowExcel 
- in the SpecFlowTests project, add in References --> right-click --> Add References --> Projects --> select project SpecFlowPages. Now, the classes will be referenced in our test and your binding should look like this:


- in the SpecFlowPages project, add Selenium WebDriver references with NuGet: right-click  References --> Manage NuGet Packages --> Online --> search for selenium and install Selenium WebDriver and Selenium WebDriver Support Classes


- we need to implement the classes with they methods. To do this you can go to NavigateSpecfFlowExcelSteps.cs and click on the method that is not implemented (red) and click ALT+Enter. This will add a new method on the correct class. You should do this for every method, property that is not implemented


- The structure of the project should be like in the image below:


13. Finally, the Driver class should look like this:


14. Finally, the ConstantUtils class should look like this:


15. Finally, the NavigateToSpecFlowExcelclass should look like this:


16. One more thing you have to do is to add the reference Selenium WebDriver under SpecFlowTests project, because this is used in [BeforeScenario]/[AfterScenario] attributes. Also, if you want to use ChromeDriver, instead FirefoxDriver to run your test, you need to add ChromeDriver into your SpecFlowPages project. To do this go to Referecens --> right click --> Manage NuGet Packages --> Online --> search for ChromeDriver


Run Tests

Now we are ready to run our test. There are different ways to do this
1. Open NavigateSpecfFlowExcel.feature file, right-click somewhere and select Run SpecFlow Scenarios


2. Run the test from Test Explorer


Some Refactoring

There is still a better way to organize our solution.

1. In order to avoid writing for each test/scenario [BeforeScenario] and [AfterScenario] actions that should be done before/after each test, we can extract the information into a different class, called Start, that will inherit Driver class. Also, all binding tests, will inherit Start class.


2. We can even organize the structure of our files better like below:


... and the Source files

For a better understanding of this example, I've uploaded the project under GitHub, so you can download it from here: https://github.com/suditur/SpecFlow_Selenium_TDD_PageObject_Example.git


I hope you enjoyed this article!
Want to lean more about BDD? Have a look on this book: BDD in Action: Behavior-driven development for the whole software lifecycle

Happy testing and... make it green, becomes a dream :).

Friday, May 29, 2015

MTM 2013 secrets

Introduction

As you probably know, MTM 2013 (Microsoft Test Manager) is a testing tool that can be used to organize test plans in suites and test cases, run manual and automated tests, define lab environments. 


This article will describe functionalities that you may not know and that can help you to manage your test plans much easier.

What is a test plan?


A test plan is a child of a test project. Think about having this kind of test plans for a project: 
- One test plan for each iteration that will contain suites linked to the requirements for that iteration
- One test plan for regression tests
- One test plan for smoke tests (this should be automated)
- You may also have one test plan that contains all test cases, grouped in static test suites that represent the functionalities of the application (authentication, administration, etc.)

A test plan may contain one or more Test Suites that can be
- Static
- Requirements based
- Query based
Every test suites contains one or more test cases. 

Also, a test plan contains a set of settings and configurations. The settings are used to define what data to collect during a test run (information about environment, a movie with the steps, etc.). The configurations are used to define different environments for run. For example "Windows 8.1 Chrome 64-bit CPU" is a set of configuration variable values. For a test case with different configuration with, let's say 3 configurations, 3 iterative runs will be performed when we run the manual test. 


Copying test suites and test plans

MTM offers the possibility to copy test cases by reference (meaning that there will be no new test cases, but the TC are referenced and, when you modify the test cases in one place, it will be modified also in the other place). Why would I need this? Think about having different test suites, one contains all Test cases with priority 1 and the other test suite contains Smoke tests. A test case can be part of both test suites.


This functionality is available like described below:


Cloning test suites and test plans

Cloning functionality will copy test cases by value (no reference, meaning that new test cases will be created).


Test cases shared steps

Shared steps are used for repeated sequences of steps, such as logging in, that will occur in many test cases. Avoiding entering to enter these sequences again and again, we should create shared steps. While running a test, if the shares step is already recorded, we can "play it" without being necessary to record it again.


Test steps parameters

Parameters allow a manual test case to run multiple time with different data. For example you may want to test if the format for email field is correct. In this case you want to create a negative test for not allowed values that should generate a validation message @email with values "email@", "@dot.com", "email@email@email.com" etc. When you run a recorded test, the test will automatically be repeated with a different set of parameters.


Conclusions

There are other interesting topics to be covered in MTM, like Exploratory testing, Test cases management in the Web portal etc. You have the opportunity to discover more "corners" of the MTM world during the test camp event that will take place on 13th June, in Iasi, Romania. For more information visit this page: TestCamp Iasi.


Happy testing and... make it green, becomes a dream :).
Friday, March 13, 2015

Testing with BrowserStack

Introduction
In this article we will present you BrowserStack used for
- live testing on different environments
- running your selenium tests on BrowserStack virtual workstation by using the desired capabilities
- taking screenshots of you page

In order to test the functionality of this tool you have to create an account and you'll have 100 minutes free plan for live testing, 100 minutes for automation and a limited numbed of screenshots.

Live testing 
With BrowserStack we can perform compatibility testing (public/internal url) on different OSs (Win 8.1, 8, 7, XP, MAC) and browsers , including Mobile and Tablet emulators (IOs, Android, Windows phone and Opera). This means that is no need for virtual workstations. 

On the virtual workstations we have Developers Tools Installed.

Negatives about this: not possible to test animations, refresh is too slow, not possible to listen to audio

Automation
BrowserStack allows running Selenium and JavaScript tests on multiple browsers in parallel: testing time can be cut down significantly if there are multiple tests running in parallel. This can be the same test running on different configurations (OS/browser), or different tests running on the same configuration. With access to our extensive BrowserStack cloud, parallel testing on many platforms becomes very efficient

Automated tests can be included in the following continuous integration systems: Jenkins, Travis, Circle

The tests can be written in C#, Java, Pyton, Ruby, Perl, Php, Node.js

Below you have an example of test written in Visual Studio with C# and opens google.com and submits text "Browserstack".


Enter your login data in:
("browserstack.user", "...")
("browserstack.key", "...")

The result is shown like this in BrowserStack account. Advantage: no need for having a remote connection, also we can see step performed in a visual manner by accessing Visual Logs tab


Screenshots
This functionality allows to view websites on real devices, with actual screen sizes, resolutions and view-ports:

We can also check web page layouts across multiple browsers at once by taking screenshots on different OS/browsers. With only one click we can generate images of a page. The images can be zipped and send to be analysed.
Costs


Conclusions

Buy the tool for one month to verify the offered functionality for:
- cross-browser testing functionality on many devices, including mobiles and tablets
- automation testing with selenium: we don’t need to create virtual workstations anymore with different environment and also able to run test in parallel (this should be tested in more detail before buying the product)
- screenshots – I would recommend this only for one user (which is more focused on UI testing, e.g. designer)

Recommendations: before buying the tool for automation, make sure you have the people capable of writing automated tests in one of the enumerated languages (for example I use C# in visual studio for selenium)

Advantages:
- no need for virtual workstations to perform manual testing and to run automated tests
- can run test in parallel
- emulators for mobile 
- pre-installed developers tools
- multiple desktop OS
- real browsers
- can test local and internal servers

Disadvantages:
- can be better documented (documentation can be found here https://www.browserstack.com/automate/c-sharp)
- sometimes is slow
- not possible to test animations,
- refresh is too slow,
- not possible to listen to audio

More reviews (different opinions):
http://www.sitepoint.com/review-browserstack-com/
http://code.tutsplus.com/tutorials/using-browserstack-for-cross-browser-testing--net-35487
https://www.trustradius.com/products/browserstack/reviews


Happy testing and... make it green, becomes a dream :).

Popular Posts