Thursday, January 29, 2015

Selenium WebDriver with C# - Create Helper Classes (2)

Introduction
In this article we will continue transcribing the java code into c# for the following links:
The following are used:
- C# ans language
- Visual Studio 2012 as IDE
- Nunit for tests
- Hudson for continuous integration

ControlUtils

In this chapter we will write functions for working with controls and also how to use them.

Wait Elements

Before starting we need a way to wait an element on the page until it will be displayed. We may either use an implicit wait, by waiting a number of seconds or either waiting the element until is displayed on the page.

- implicit wait
- explicit wait

Functions for Controls
- get_text

- verify text
This function will return true or false and will check if the control's text is correct. You can use it like this.


- element_present
This function will return true or false and will check if the control is present or not on the page. You can use it like this.
- link_present
- click_link
- click_element

Usage: 

- double_click_element

Usage: 


- get_attribute
Below usage will return the Login button class name: 

- is_attribute_present
This will check if an attribute of a control is present or not. Imagine for example that you have to test if a control is or not disabled. Usage:

- send_keys

- refresh_page
- functions for selection controls

Happy testing and make it green becomes a dream!

Wednesday, January 21, 2015

Selenium WebDriver with C# - Create Helper Classes (1)

Introduction
In this article we will transcribe the java code into c# for the following links:
The following are used:
- C# ans language
- Visual Studio 2012 as IDE
- Nunit for tests
- Hudson for continuous integration

DriverUtils
First of all we can create a DriverUtils class that will contain functions for starting the web driver, getting the browser, opening the desired url, closing browser, login, logout, functions to be executed before and after all tests are run or after all test from a class are run. Also, we can include here a function that will log, at the beginning of each test, a name and a description.
Let's start!

Start WebDriver
  • Browser is an enum

  • _driver is declared globally
  • _driver is set and get
  • For working with Chrome and IE drivers we need to download the .exe drivers and include them in the project. 
  • Capabilities: describes a series of key/value pairs that encapsulate aspects of a browser. You can find more information about this on the internet
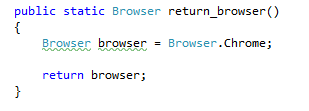
Return Browser

Open url
In order to open your url you can create a function

where the url is define in a ConstantsHelpers class

Close browser
Wait time 
This is a function used to implicitly wait the specified amount of time in milliseconds
You can use it like this:
wait_time(5000);

[SetUp][TearDown]
Depending on your project, you can set some actions to be taken:
- before starting all tests SetUp
- after running all tests TearDown

Here are some examples:

Login, Logout
Supposing you web page has a login page, you can include the Login, Logout function in SetUp and TearDown functions.
Below you have a login, logout examples:
Test Case Description
Another function that we added in this class is the one that, in the test logs, at the beginning of each test, writes a brief description about the test to be run.

Hope you enjoyed this article. Next week we will present more functions translated from java to c#.

Happy testing and make it green becomes a dream!

Monday, January 5, 2015

Selenium WebDriver in Visual Studio

Introduction

This week we will present how to use Selenium WebDriver in Visual Studio.
We used the following softwares (but these are not mandatory):

  • Windows 8.1
  • Visual Studio 2012
  • NUnit
  • Selenium
  • NuGet
  • Resharper

Installation

In order to create a new project with Selenium WebDriver:

  • Open Visual Studio and create a new C# class project
  • Download and intall NuGet from Tools --> Extensions and Updates. Restart Visual Studio in order to apply the new settings
  • Open Library Package Manager from Tools --> Library Package Manager --> Package Manager Console
  • Install the latest version of Selenium WebDriver by running command Install-Package 
  • Selenium.WebDriver -Version 2.44.0
  • Install the latest version of Selenium WebDriver Support by running command Install-Package Selenium.Support


  • Install Resharper from https://www.jetbrains.com/resharper/download/
  • Install NUnit  from http://www.nunit.org/
  • Add the NUnit reference for the created project by right-clicking on the Reference --> Add reference and add the path to the nunit.framework.dll, in our case C:\Program Files (x86)\NUnit 2.6.3\bin\framework\nunit.framework.dll


At the end, the Solution Explorer should look like this:


Creating the First Test

We will not detail the way we should write the C# code this week. But the idea is the same like described in two previous posting http://ralucasuditu-softwaretesting.blogspot.ro/2014/12/selenium-webdriver-create-helper.html and http://ralucasuditu-softwaretesting.blogspot.ro/2014/12/selenium-webdriver-create-helper_17.html.
Just translate the java code in C# code, but taking into consideration some differences that will be later explained.
Here is a test example where we marked some differences:


Running the Test

We will explain two ways of running a test.
If you have Resharper installed that you can click on the left icons to run all tests in a class or only a test.


If you don't have a Resharper license then:

  • Go to menu Projects --> Projects Properties (where 'Project' is the project name)
  • Select the Debug tab


  • Click on Start external program and set the path to nunit.exe, in our case C:\Program Files (x86)\NUnit 2.6.3\bin\nunit-x86.exe
  • Build the project
  • Run the tests by pressing F5 key. NUnit will be opened and, from here you can run your tests.


Happy testing in 2015 and... make it green, becomes a dream :).

Popular Posts