As we promise, this week we will explain how to integrate java, webdriver, intellij idea, junit, maven, hudson. The objective is to have a continuous integrated system, to run the automated tests during night.
The following will be covered:
- Installing Java, Intellij IDEA, Maven, Firefox
- Configuring Intellij IDEA and Maven for Selenium WebDriver. Also, we will show you how to create your first project in Intellij IDEA
- Installing Hudson for continuous integration
- Using Hudson and Maven for test execution
Installing Java, Intellij IDEA, Maven, Firefox
Below you can see a diagram with the required tools in order to use WebDriver with Java
As we already mentioned, we will use Maven, Intellij.
Installing Firefox and the necessary plugins
- Go to getfirefox.com and download Firefox
- Install the following plugins: firebug (debugger used to identify objects), Selenium IDE (used to record actions; beginner users can use this), firepath (used to identify the absolute/relative path and Element locator for WebDriver (very usefull to identify by xpath an element and can be used with element right-click-->Java locators)
Installing Java
- Check first if java is not already installed on your computer (open a command prompt and type java - version)
- If not, than go to the oracle site and install the correct version of java: http://www.oracle.com/technetwork/java/javase/downloads/index.html
- Go to Environment variables (Computer --> Properties --> Advanced System Settings --> Environment variables) and check if the java variable (location to bin installation folder; e.g. C:\Program Files\Java\jdk1.8.0_25\bin\) is added to the system path
- Now, when you type java - version you will see that java was installed
Installing Maven
- Download latest Maven corresponding to you system from http://maven.apache.org/download.cgi
- Place the unzip file under folder C:\Program Files\Apache Software Foundation
- Create the user variable M2_HOME (Computer --> Properties --> Advanced System Settings --> Environment variables --> New User variable - not a system variable). Pay attention, if the maven version changes, then you should update this variable)
- Create M2 user variable that points to the Maven bin folder
- Add the user variable path (not a system) variable that contains the path to Maven bin folder %M2_HOME\bin%
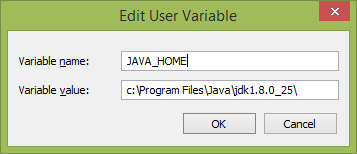
- Create JAVA_HOME user variable that points to java root directory
- Reopen the command prompt and check that maven was installed mvn--version
Installing Intellij
- Download latest version from https://www.jetbrains.com/idea/download/. Select the community edition which is free
Configuring Intellij IDEA and MAven for Selenium WebDriver
In order to work with Maven, we need to create a new Maven Intellij project and to set the path to the jdk location. Then give a group and artifact id and then the project name and location.
When the project is generated, it is important to enable auto import. By doing this (message appears on the top right corner), all maven dependencies will automatically be imported.
In order to write selenium tests we need to bring first junit and then selenium in our maven pom.xml file. The following information should be added:
Now we can add our first test. Create a Test class from Java-->New Class and name the class. It is important that the class name contains in it's name the word test so that maven can run tests from this class.
Installing Hudson for Continuous Integration System
Now that we found out how we can write the tests, we should be able to use a continuous integration system that can automatically run our tests. There are different tools that can be used like TFS build, Hudson, Teamcity.
Hudson is a CI server for the Java development community. Running tests with Hudson and and Maven needs both tools installed on the server.
- The tool can be downloaded from here: http://hudson-ci.org/.
- The .war file should be deployed on the server where you want to run your tests.
- Create a .bat file on your desktop that contains this java -jar "...path to the file\hudson-3.1.2.war"
Using Hudson and Maven for Test Execution
- Access you Hudson page by using this link http://localhost:8080/. You can access Hudson from other workstation. To do this just replace 'localhost' with the server host name.
- Add a new hjob and select Maven 2/3 option
- Go to the job configuration page and in Advanced Job page set the maven workspace that you are going to use
- Go to Build area and add 2 steps: one that has as goal the cleaning of the project before the build and the other the running of the tests. For both steps we need to set the path to the pom.xml file.
- If your project is under a source control system you need to adjust the settings from Source Code Management group
- If you want to build your project at a specific hour go to Build Triggers group and make the changes in Build periodically field
- Save the configuration
This is the end oh the story. Next time we will see how to integrate Selenium WebDriver in Visual Studio.
Happy testing and... make it green, becomes a dream :).


